
With more than 650 million daily visitors, Facebook provides business owners who use its advertising features with wonderful conversion potential. But since you’re also competing with more than 1.5 million advertisers and 30 million branded Facebook pages, it’s essential to outshine the competition if you want to make a difference in your website conversions.
In previous posts, I’ve discussed how you can use Facebook’s Promoted Page and Promoted Posts campaigns to put your page in front of a quality audience. Today, I want to delve into another type of Facebook advertisement: website conversions. By choosing this type of ad campaign, you can encourage visitors to your website to take a certain action, and use a conversion pixel to measure results. Your ad will appear in the news feeds and sidebars of your target audience. Take a look:
This is how an ad might appear in a user’s News Feed.
 This is how an ad might appear in a user’s sidebar.
 Look good? To help you start a website conversion-boosting campaign of your own, I’ve outlined each step of the process below.
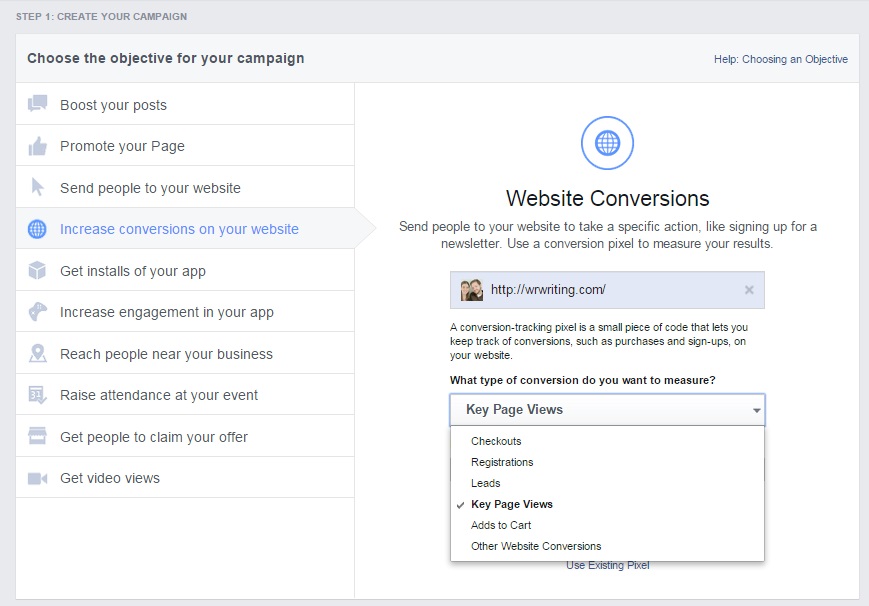
Step One: Create the Pixel
After logging into your business’s account, visit the create advertisement dashboard by clicking here. Select the objective “increase conversions on your website”, and then enter the URL of your company website, or the website you want to promote.
Next, you’ll be asked to select the type of conversion you want to measure. You can choose from the following options:
- Checkouts
- Registrations
- Leads
- Key Page View
- Adds to Cart
- Other Website Conversions
After deciding which type of conversion best suits your campaign goals, give your campaign a name and click “create pixel”.
Step Two: Transfer the Pixel to Your Website
Next, you will be given a code for your pixel, and the option of either sending it to your web developer or adding it to your website yourself.
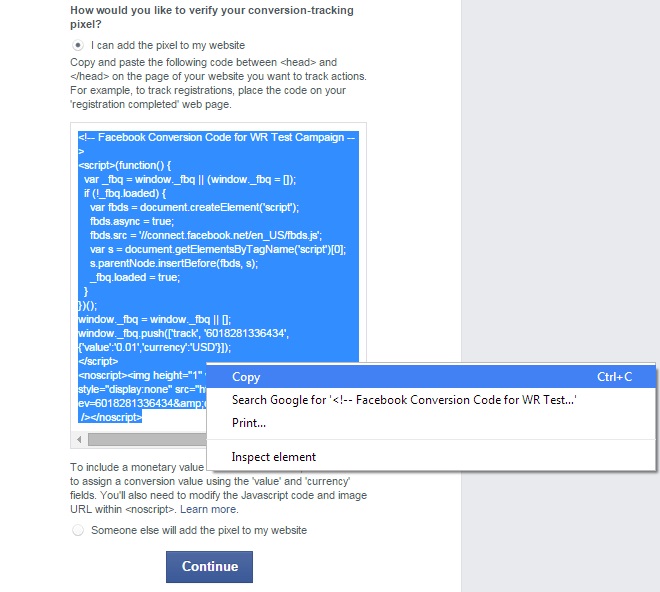 To add the pixel yourself yourself, copy the pixel and place it between the <head> </head> tags on the webpage where your chosen conversion will take place. This step is crucial since it’s how Facebook actually tracks the conversions.
Step 2 A: (Optional) Assigning a Value to Each Conversion
If all you care about is the number of conversions, you can stop here. But if you are selling something with each conversion, it can be invaluable to measuring the ROI of your campaign to assign a value to your conversion.
If you require the value to be dynamically updated, then you’ll likely need to talk to your webmaster. What does that mean? If your order value varies, for example, because people buy different numbers and types of items, you’ll want that number changed dynamically. You can insert that final shopping cart value into your pixel, so you’ll get the most accurate ROI analytics.
But if each conversion is worth the same amount, then you can do it yourself. It does require modifying coding, which some people find intimidating, but it just requires a little attention to detail.
So let’s say that with each conversion, you’re selling your eBook for $9.95. There are two places in the code that Facebook provides where value is mentioned, so you’ll have to update them both.
Here’s what the first line looks like:
window._fbq.push ([‘track’, ‘1234567890’,{‘value’:’0.01′,’currency’:’USD’}]);
The two areas highlighted in yellow are the things you may want to change. Everything else should remain the same. We’ll assume that your currency is U.S. dollars, so we’ll leave the alone. But for value, here’s how you would update it to the $9.95 price.
window._fbq.push ([‘track’, ‘1234567890’,{‘value’:’9.95′,’currency’:’USD’}]);
And here’s the second line you want to look at. The areas that you may want to change are highlighted in yellow.
<noscript><img height=”1″ width=”1″ alt=”” style=”display:none” src=”https://www.facebook.com/tr?ev=1234567890&cd[value]=0.01&cd[currency]=USD&noscript=1″ /></noscript>
So here’s the same line updated for that $9.95 book:
<noscript><img height=”1″ width=”1″ alt=”” style=”display:none” src=”https://www.facebook.com/tr?ev=1234567890&cd[value]=9.95&cd[currency]=USD&noscript=1″ /></noscript>
Now you’ll be able to see exactly how much you’re earning with your ads. To see the data in your reports, you’ll need to click “Customize Columns” and check “Totla Conversion Value”.
Step Three: Verify Your Conversion Tracking Pixel Is Working
Once you’ve added the pixel to your website, you can check its status on the Ads Manager. Visit the Conversion Tracking page, and check the Pixel Status column to make sure your pixel is “active”. This will not happen until after you’ve had your first conversion.
Before a conversion event is recorded, your pixel status will remain unverified. If it is unverified or inactive for a long period of time, however, you can make sure it’s working with the Pixel Helper tool. Note: You’ll have to use a Google Chrome browser for this to work.
Step Four: Create Your Ad
Once your pixel is up and running on your site, you can begin creating ads. Head back to the create advertisement dashboard and choose “Website Conversions” again as your objective. Select the pixel you want to use.
Next, you can define your target audience by indicating criteria, such as location, age, gender, and interests. For more information and tips on defining your target audience, check out my previous post on Promoting Your Page.

Afterwards, you’ll be prompted to indicate a budget. For website conversions, you pay on a CPM basis. You can also set bidding to “Optimize for website conversions”. This allows Facebook to use the data it gathers from that conversion pixel to adjust your bidding strategy automatically.
Next, you can upload an image for your ad, or choose one of the millions of professional images Facebook offers its advertisers for free. Either way, you need to remember that Facebook has a rule that only 20% of the image can contain text.
Tip: Not sure if your image will qualify? Facebook has a tool that can help, but I’m not even going to provide a link to it here. Why? Because I’ve found it’s not entirely accurate in predicting what will pass and what won’t. Here’s what I recommend: submit the image and let Facebook decide. It seems to depend highly on who reviews your image, because I’ve had the same image rejected for one ad and accepted for another.
Select your business’s Facebook page, and add a headline and text for your ads encouraging an action. You can also opt to include a call-to-action button that encourages one of five actions—Shop Now, Learn More, Sign Up, Book Now, or Download. Will your ad perform better with a hard sell, such as Book Now, or a soft sell, such as Learn More? Try A/B testing which different call-to-action buttons.
Tip: One thing to consider when selecting the “Download” call-to-action button, make sure it’s clear what they will be downloading. Many people are wary about downloading files for fear of viruses and other malware, so the more clearly legitimate you can make your offer upfront, the better. And you may want to test the softer “Learn More” as well as the “Download” button just to see if that concern is creating a barrier to click-throughs.
To the right, you’ll be able to preview how your ad will look in a desktop News Feed, mobile News Feed, right column, and partner mobile apps.
 Step Five: Measure Conversions
After creating your ad, you can monitor its performance in the Ads Manager. With this tool, you’ll be able to monitor the useful data, including the number of conversions you’ve received and the cost per conversion.
Best Practices for Increasing Web Conversions: The Power of the Pixel
As always when creating Facebook ads, keep in mind some key principles:
Know your audience. To determine your target audience, its important to do a bit of homework. Think of your ideal customer, and figure out their interests, behaviors, and demographics. Test different groups to find out what works best, and try going both general and specific.
Design eye-catching ads. Your images, headline, and text need to catch the eye of users immediately. Your ad’s call-to-action should be clear and compelling.
Let Facebook bid for you. We mentioned this earlier, but it’s worth repeating here. That pixel is gathering data with each conversion, so Facebook can better determine who is likely to convert. By adjusting your bidding to “Optimize for website conversions”, you’re allowing Facebook to make use of that data to get you better results.
Make your offer clear. You have defined the conversion that you want people to make, but is it clear in your ad what step you want them to take? This is crucial to its success.
Configure that conversion value. It’s worth the effort, even if you have to ask your webmaster to help. After all, it’s hard to tell exactly how ads are performing if you don’t understand how much you are earing.
Create a lookalike audience from your conversion pixel. Facebook now knows exactly who converting because of that pixel, so they can use that data to target other similar people who may be interested in your offer. It’s a potentially powerful way to find new customers.
Test, test, test! Experiment with different conversions, audiences, images, text, and call-to-actions. Try out different times, and work with different budgeting options to see what gets you the most cost-effective results.
Awesome post Tom! Your post shows that you did a lot of research before writing this great article. Thanks for sharing with us.
thanks for the comments!
Pingback: 7 Ways To Market Your Business on a Budget - Tom Fanelli
Most Valuable article. I am looking for so many days how to get more internet traffic for my website through facebook. Your post provides me the ways and approaches to accomplish it.
Very Thanks Mr.Tom Fanelli.
Please update your site with great posts like this regularly
Education related to the I.T field should spread in the students step by step by guiding them the right way about their abilities and knowledge against to the computer and technology which helps the students to increase their knowledge and also help them in their future.