
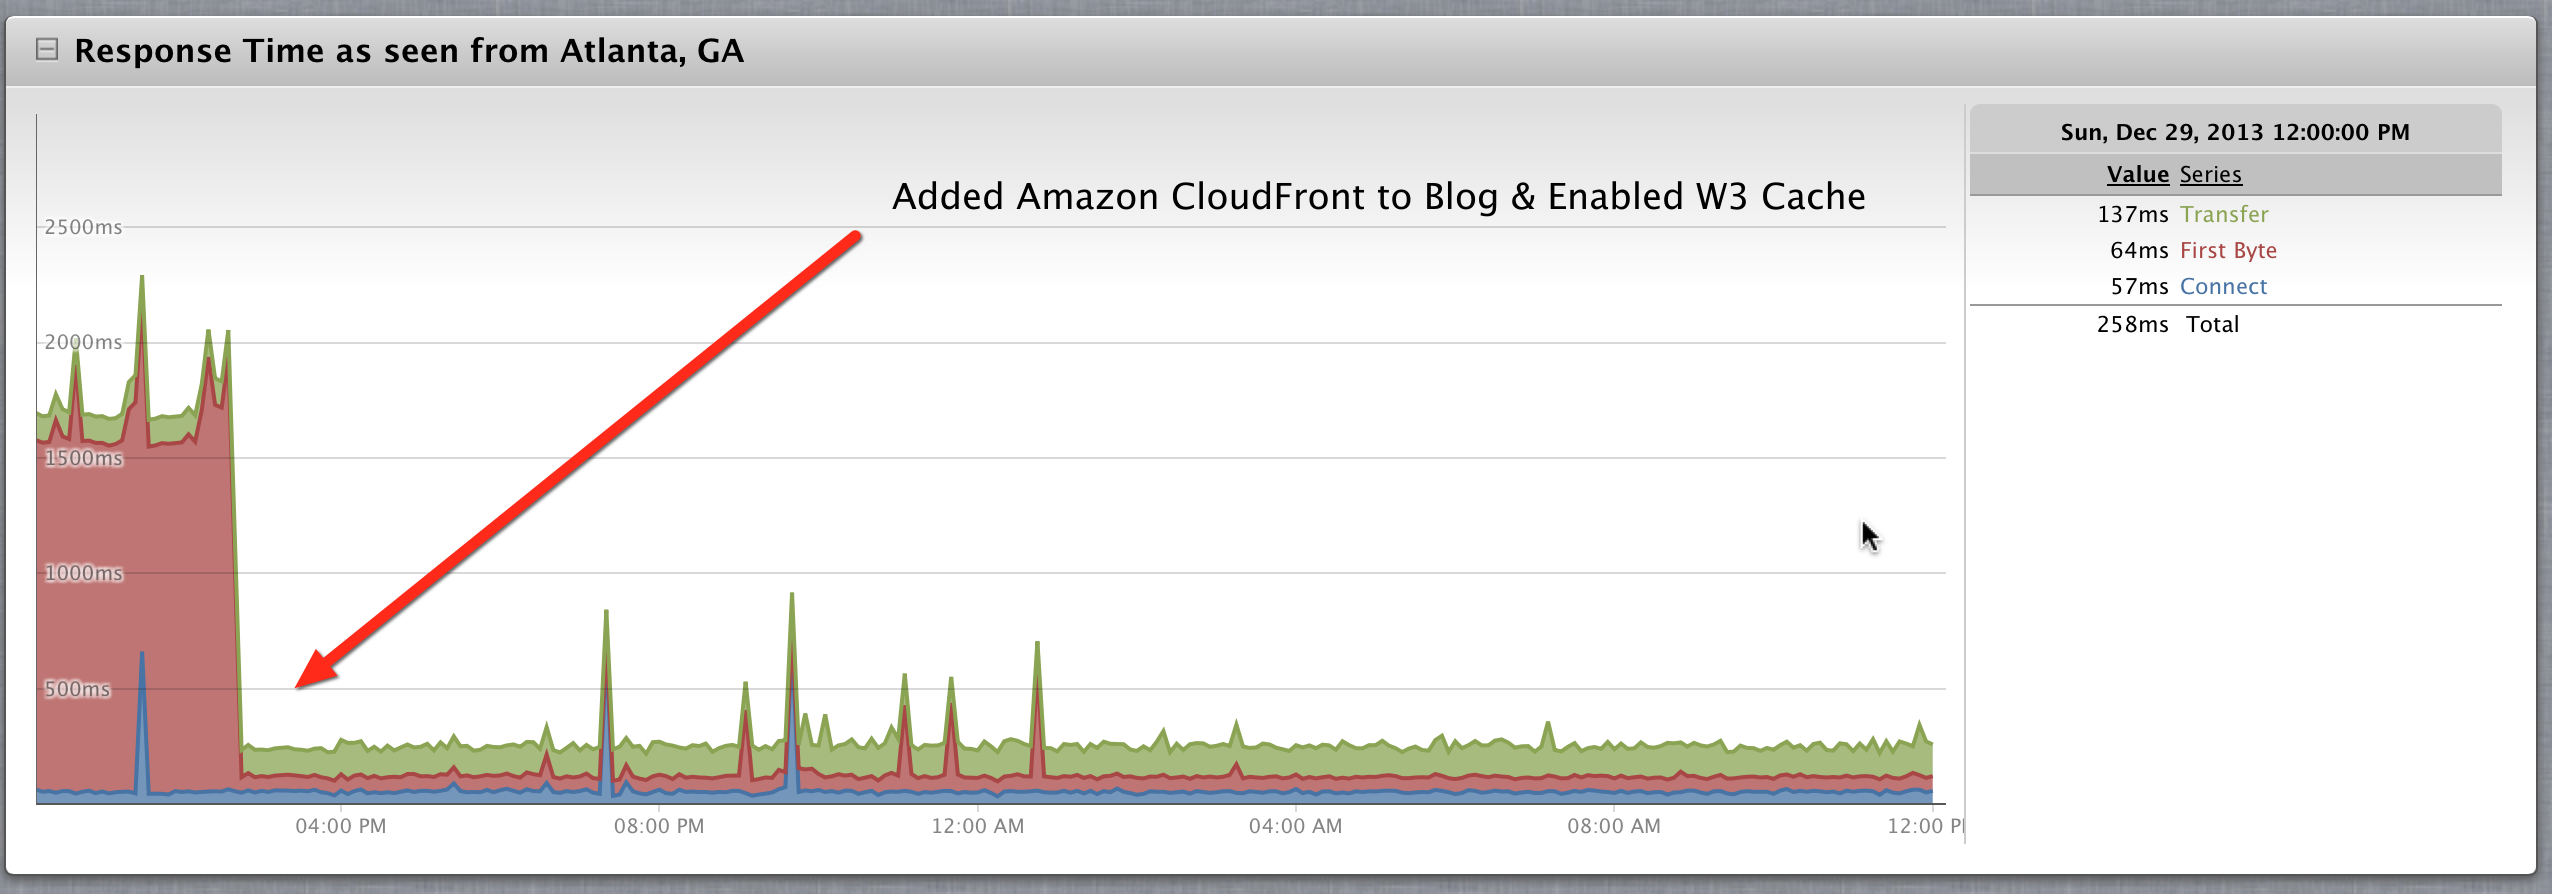
Using this and some other tactics like a Content Delivery Network, I recently lowered the response time of my site considerably. If you are using WordPress, you can use the W3 Cache Plugin which makes this as easy as checking a box. On the top details….
Whenever someone visits your website, their browser loads several files such as HTML, CSS, JavaScript and images. These take a pretty long time to load, especially if the user is on a slow internet connection. The user’s browser also has to make a separate request to the server to load each file, which places a major load on your server.
This won’t be a problem if your website doesn’t contain a lot of files. But if your website has a lot of images and different elements, then not only is a lot of load placed on your server, but loading times is also very poor for the user. An example is the Twitter homepage, which is over 2 MB in size.
Browser caching solves this problem by storing some of these files locally on the user’s computer. So although the first time the user loads the page, loading will take some time, it will be much faster the next time the user visits the page or even if he refreshes the page.
How does this work?
Well, the majority of the website’s files are unlikely to change over time. For example, you wouldn’t change your website’s logo every other day. Since your logo will never change for some time, the file for the logo will be stored in the cache of the user’s browser.
Browser caching works by marking parts of your pages to be updated only at specific time intervals. You can configure your site’s caching so that certain types of files are only updated at these intervals. For example, all images can be set to reload only once per week.
Not only does browser caching speed up reloads of your site’s home page, it also makes the entire website much faster by caching the files that are the same across all pages. Your site’s logo, the layout, the sidebar links, etc. are the same on all the pages of your website. So the browser caches these files, and the entire website is sped up as a result.
How do you enable browser caching on your website?
To enable browser caching, you have to edit the .htaccess file on the root of your domain. This file is hidden, but it should show up in FTP clients such as FileZilla and CORE. Add the following code to the file:
## EXPIRES CACHING ##
ExpiresActive On
ExpiresByType image/jpg “access plus 1 year”
ExpiresByType image/jpeg “access plus 1 year”
ExpiresByType image/gif “access plus 1 year”
ExpiresByType image/png “access plus 1 year”
ExpiresByType text/css “access plus 1 month”
ExpiresByType application/pdf “access plus 1 month”
ExpiresByType text/x-javascript “access plus 1 month”
ExpiresByType application/x-shockwave-flash “access plus 1 month”
ExpiresByType image/x-icon “access plus 1 year”
ExpiresDefault “access plus 2 days”
## EXPIRES CACHING ##
As you can see, the code is not too complicated and can be understood even if you are not a programmer. The ExpiresByType and ExpiresDefault headers set they set the expiration date unconditionally from the point that the user visits your website. You can use the keywords ‘week’, ‘month’ and ‘year’ to set the expiration date. Setting specific dates or time periods is possible, but quite unnecessary in this situation.
If you’re using a CMS such as WordPress, then there is most probably a plugin available to enable browser caching. This makes everything much easier and will allow you a bit more flexibility in how you handle your website’s caching.
Here are some recommendations:
- Be aggressive with your caching for all static resources, such as images.
- Set the expiry to a minimum of one month, and to a maximum of one year.
- Don’t set the expiry period to more than a year, as this violates RFC guidelines.
But what if you set the image expiry date to one year, and you change your website’s logo the next month? Won’t the user still be seeing the old logo if it has been cached unconditionally, even if you have changed the logo?
This won’t be a problem, as most browsers’ caches are pretty short-term and are purged on a regular basis. More specifically, they are purged using the Least Recently Used algorithm, which means that the cache is purged after some time has passed without your having visited the website. The browser reloads the site’s elements the next time you visit the site after this period. Most browser always purge their caches using the algorithm, and there’s no browser known that doesn’t purge its cache.
Browser caching is very important!
As a webmaster, it is absolutely crucial that you enable browser caching on your website. We all know that the present breed of humans has a very short attention span. We hate buffering videos and pages that pop together as images slowly load. Most users will not stay for more than a few seconds on your site it turns out to be slow, most will leave quite quickly and may go elsewhere. From a marketing/business standpoint, it is easy to see why browser caching is very important!