
Have you ever been scrolling through your Facebook News Feed and seen that one of your friends has “Liked” a page, claimed an offer from a company that they liked, or checked in at a specific location? If you’ve used Facebook even only occasionally, the answer is probably yes.
These updates all stem from Sponsored Stories, meaning that a company can pay to have their name or image highlighted when a Facebook user interacts with their brand. For example, if your aunt clicks the “Like” button on Starbuck’s Facebook page, this activity will show up in her friends’ News Feeds, in between other status updates.
That’s all well and good if you have a specific brand name that you want to promote (especially if it’s already a fairly well-established brand), but how does this apply to infographics?
Well, you can create a similar ad that allows people to click through to your infographic. Since Facebook allows you to decide who you want to see the ad, you can better target people who might be the most interesting making it more effective than more general forms of marketing.
Here’s a step-by-step guide to use Facebook sponsored stories to promote your infographic.
1. Log in to your Facebook account and go to the Ads Create Tool. You can search for this tool or just enter the URL: https://www.facebook.com/ads/create/.
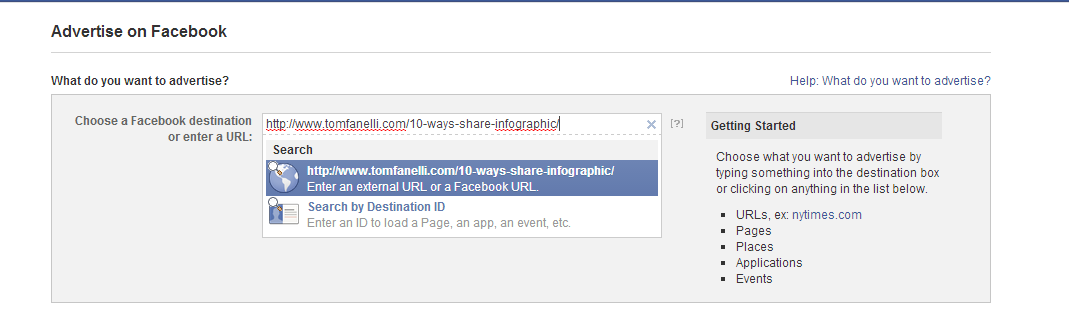
2. Input the URL for the infographic you want to promote. If you’ve already posted your infographic to your website, you should be able to directly copy and paste its URL.
3. Choose CPM or CPC. CPM is cost per thousand impressions (page views) while CPC is cost per click, and since you want people to click through to your infographic, CPC makes the most sense.
4. Set a budget. Facebook will let you set a budget per day or per the lifetime of the sponsored story, so figure out your budget based on your goals. Your ad will be placed based on the budget and period of time that you enter. You can select optimized bidding to automatically help you achieve the goals you set, or you can select ‘Advanced Settings’ to have more control.

5. Write the text for your ad. Your audience is only going to see a small thumbnail of your infographic or the graphic you choose to display and a brief text description, so you need to make sure that the text is compelling if you want viewers to click through to see the full infographic. Consider asking a question that your infographic will answer, and be sure that your text is clear—viewers should know exactly where they’ll go when they click.

6. Include an image. This is that thumbnail of your infographic that I was talking about in the last step. In many cases, a thumbnail won’t look very good since it will make all the data and graphics small and hard to read. Consider just taking the title if it’s attractive, one of the more compelling sections of the infographic, or even creating a custom graphic that encourages people to click through. The recommended size is 1200 pixels by 627 pixels. But you at least want to use an image over 600 pixels by 225 pixels to ensure that it appears in the newer, larger format on Facebook. Otherwise, it will appear in the older, less attractive format.
7. Consider multiple images. Not sure what graphic is best? You can include several. Multiple ads are generated under one campaign, so your budget goes toward the image that’s performing best. Facebook allows you to include up to 6 images.
8. Choose your ad placement. You can either have the ad for your infographic placed in the News Feed, the right column, or both. The advantage of having your ad placed in the News Feed is that people are more likely to engage with your content because it’s appearing amidst text and photos posted by their friends, which they are likely already engaging with through pressing the Like button or posting comments.

9. Select a target audience. Facebook lets you narrow down your audience based on specific interests, so use keywords related to your infographic to make sure that the people who are most interested in the subject will see it. You can also narrow down your audience based on location (so, for example, if your infographic is most relevant to people living in Austin, TX, you can target your ad towards people in that city). To get even more specific, you can narrow down your audience based on age, education, and connections.

10. Make sure your target audience is large enough. As you narrow down your audience based on the above factors, an estimate of your audience size will appear on the right. You want to make sure you have at least a few thousand people.
11. Double and triple check. Make sure spelling, your link, and your image are all correct. A minor typo, broken link, or image error will compromise your credibility, and you want to make sure you’re getting your money’s worth out of your ad by making it look as good as possible.
By choosing the right target audience and having compelling text and images, you can use the Facebook Create Ads tool to dramatically increase the number of views for your infographic. The Sponsored Stories feature is also a great way to get people to share it with their friends.
This is very nice blog.
Nice and let me tell one thing that it not my hobby to post comment on other blogs but you written it very well so i made up my mind to post comment.
Thanks for the comments!
Thanx Tom for sharing this useful &informative article.From this post I have got a nice idea to promote my infographic.
Thanks Tanveer!
Very interesting. I am happy to read this blog content. Thanks for sharing.
Pingback: The Ultimate Guide to Social Media Marketing—Part 2: Social Bookmarking Sites |Observations of a Bay Area Technologist |
Pingback: Simple Ways to Use Pinterest to Get Traffic for Your Website or Blog
This takes me back to the linkedin article I read on this site (https://www.tomfanelli.com/running-paid-linkedin-ads-step-step-guide/), I have been researching both of these options lately and needed to understand how they both worked. Thank you so much for this information because you have given me the guide I needed. The Facebook “help guide” is not very useful 🙂
Hi. Advertising on facebook these days has become extremely competitive. This is an excellent blog for SEO. I would like to say that marketing your brand on FB is a really smart thing to do, and I will follow your guide as said above, and I am sure it will pay me off well!
Thanks a ton for all your perfect guides, they help newbies on the web – like me.
I just started a Fashion Blog For Men,
http://www.theguyfactor.com